DIY Projects brings you a step-by-step article on how to paint a room. Any proficient painter will tell you that the most important thing to a perfect paint finish is the preparations. We’ve already shown you in this do-it-yourself tutorial, how to prepare your walls for painting the right way. Please study that article before you read this one. That home improvement article also shows you how to first remove your wallpaper before any of the work starts. For the wooden parts of your room (like your door frames and skirting boards etc, how to paint wood will show you exactly what you need to do.
Now let’s show you how to paint a room
You will need:
Paint tray
Masking tape
Paint roller
Brush
Wet cloth to wipe spills (wet wipes will do).
Painting made easy
The primer should take a couple of hours to dry. At this point, you’ve removed the wall paper (and wallpaper lining where applicable), cleaned the glue off the wall, filled the holes and gaps, sanded the filler, dusted the wall (for loose sandy particles), primed the wall and sealed the edges. Now your wall is ready to take your nice, expensive paint you’ve spent so much money on. These easy steps will help your painting go more smoothly. (Remember to read the article linked above before you start painting or you’ll waste your time, money on effort if the right preparations aren’t met before painting starts).
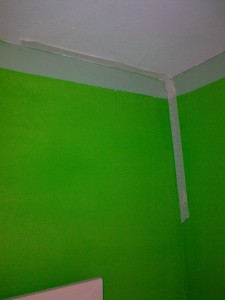
1. Put masking tape at the edge of the ceiling (like in the picture below), at the top of the skirting board (the wooden bit at the bottom of your wall), around all door and window frames, and at the edges of your wall. If you’re painting the entire room the same colour, you don’t need to worry about applying masking tape at the edges (like in the middle of the picture below). The top, bottom and around door/window frames will do.
2. Paint the top of the wall (horizontal edge – between the ceiling and wall) with a paint brush. Also, use your brush to apply paint at the left corner (vertical edge) of the wall. Don’t do the entire horizontal and vertical edges before you start painting with the roller. Half of each is okay. You want these brush-applied paint (different texture) to still be wet before you use the roller. You want to be able to blend these two textures of paint.
3. Use your roller to apply paint onto the wall. Paint in all directions, but make sure your last strokes are up-down (for uniformity). Make sure your roller touches and covers/blends the paint you applied with the brush. Don’t leave brush strokes. If you can see the strokes when the paint is wet, you’ll see them when it’s dry too. Just use your eyes for a nice uniformity.
4. Repeat step 2 (horizontal and vertical edges) for the rest of the wall. Then continue painting with your roller.
5. Cover your entire wall in this manner.
Points to note when painting your room
1. Cover your floor with old sheets or layers of newspapers. No matter how careful you are, paint will spill onto your floor. Same for your clothes.
2. Most paints require at least 2 coats (regardless of what the manufacturers tell you). Emulsion paint (the paint you apply on walls) mostly take about 2 hours between coats. Wood paint will need up to 24 hours before it can be re-coated.
3. Try to paint both coats of paint on the same day. Remove masking tape when second coat of paint is still wet. If you leave it to dry on you run the risk of taking your beautifully applied (new) paint off with the masking tape. Many of them (masking tapes) are good, but always be on the safe side. I’ve had to learn by experience.
4. If you’re painting the wooden bits in your room when doing your home improvement, paint them first. It’s easier to wipe emulsion paint off the wood (use a wet cloth), than it is to wipe oil paint off your freshly painted wall (use white spirit).
5. It’s a good idea to have a wet cloth at hand while painting your room. Drips on the skirting board (for example) can be wiped off straight away to save yourself the trouble of scrubbing later on.
If this ‘How To Paint A Room’ DIY tutorial has helped you please share it with someone else who may benefit from it. We’d also appreciate it if you shared it on your favourite networking site. If you have any questions please leave them in the comment box below. And while you’re here, we’re sure you’ll find the other articles in the diy tutorials series a great help with your diy projects.
Can you share other painting tips you’ve picked up over the years?
What was the last room you painted, and what colour did you use?


A lot of people are taking on home improvement stuff lately because they can’t trust companies anymore. Thank God for the ones that are honest and do good work! I know I’ve attempted carpet cleaning, carpet installation, interior painting, exterior painting, tile and grout cleaning, sheet rock repair, seagrass repair and lots of others. It saves much more time and money when you find a good local company that can handle all of it.
Hey Anne.
You are doing great. This article covers all technical details about painting. Anyone can paint by following your techniques. However, I’m a civil engineer and now working in building construction field.
I tried twice to do it, but fail, this is looking very simple, but the smoothness in paint will get only by professionals.
That’s not necessarily true. As long as you do the preparations right, painting is the easiest part of the job. I recommend reading the article about the preparations before painting, then try again.
I’m sure you can do it. I get an absolute smooth finish each time. However, I spend a lot of time preparing for the job.
Great article with great timing, I was just wondering about painting my new room, thank you..
These are some great tips! It has been a while since I’ve painted a room and I’m supposed to paint our living room soon so this was a great refresher! Thanks for sharing!
Thanks for this, just about to start decorating my 5-year-old sons room this weekend with Toy Story paper and a bit of paint, not one of the things that I would say I’m too skilled at being an Online Marketer and all but this post has defiantly helped!
Thanks! Keep up the great work!
Great Post !!! It helps me to take care during painting in my room, and the idea of masking tape is very new to me
Thanks for this nice article. I love to mess around my room on weekends and surely this tutorial will help to give my room a new look soon.
Hi , thanks for this very helpful article
speacially the tape part , it’s make the work a lot easier
thanks again
ali
Thank you sharing these tips and I will definitely not o forget it and so that I will remember it I will bookmark this one and also I will share this to all my social media sites.
Wao now it seems east to paint my home my self.
Great and useful painting tips.
It is funny because i didnt really do a good job while painting my room myself. wish i had seen this blog earlier.
This is awesome! I have never painted a room myself before, but with these tips I think I can surely do this on my own. Thanks for the help!
Hey Anne, Very Nice Post !!
Earlier I had never tried my hand at painting but after reading your points I think I can surely do this too and with ease. Thanks for sharing this tutorial. 🙂
I just bookmarked your blog. I was planning to get my house painted but I think now I can try myself… well will try with a small room….
Excellent post. I really love visiting your articles because every time you share some practical things that we can do ourselves. Even though I will not do this myself I am glad that I have some knowledge about painting. Thanks Anne.
Great post, really helpful. Thanks for sharing this infomation, I’ve bookmarked this site.
Painting my apartment with my wife (she was my fiance at the time) was such a great bonding experience for both of us. Throw on some great music and really get into it. It’s fun to see the finished work. Plus, it’s kind of a workout for your shoulders while you’re paining. I think painting a wall or even a room is something everyone should try at some point in their life. Great step by step article.
Hey Anne, I must tell you your post made painting a room hell lot less messy. I think I can try my hand at it now, earlier I never tried it just thinking of the mess, but I think there is a way out now. Thanks a lot for sharing it with us.
Thank you very useful tips! I ‘ll have them in mind next time I paint my house.
I must thank you sharing wonderful information. Your blog looks great. I will drop by soon again.
Great DIY painting project. yup this post is genuinely nice and I have learned lot of things from it regarding painting. thanks for sharing it!
I am actually painting the rear of my office tan. I am using knock out sprayed first then a sprayer for the top coats. It gives a textured effect that looks awesome.
Thank you for advice. I’m reducing my all apartment and painting is one of the projects. Will be saving a lots of money by Not hiering painters.
This year, I’ll be doing a lot of this! Thanks for the helpful info Anne. I need to learn the skills of painting. We need to do this on our own to save a bit.
This is an easy way to paint your room. I really enjoyed painting a room especially when it’s mine.
So many people try to rely on professional painters instead of just painting the place themselves.
You give lots of great tips!
Great DIY Ann! Very important as you say to have a wet cloth at hand while painting. The first time I painted I didn’t use it and it took me so long to take out the marks…
Thanks, Ravit.
Yes. You do need a wet cloth when you’re using emulsion paint. When painting with oil paint however, (painting wood) you need a cloth soaked in white spirit to wipe spilled paint. Welcome to DIY projects. Do come again!
The last room I painted was yellow and you are so right about the paint ending up everywhere. Take care to protect your floor, yourself and the contents of your room. Our paint was “odorless” but I had an awful migraine after, so take care to use ventilation.
You’re right about the ventilation, Judy. You need to open all windows when painting. Oil paints are worse than emulsion paints when it comes to odour. When I was painting every day I used to have light-headedness.
I’m not painting as often now, so I don’t have to worry about that.
Your blog looks great. Wish you much success and continuous flow of info to share with us. 😉